Adding a Workspace
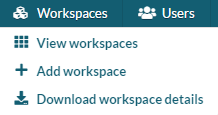
From the Tenant Administrator workspace list, you can use the + Add workspace button in the Workspaces dropdown menu to add a new workspace to your hub.
 Clicking the button opens up the workspace creation screen. The fields listed below are available for editing.

Name (Mandatory)
The workspace name must start with a letter, be between 2 and 19 characters long and may only contain lowercase letters, numbers and hyphens. Once created, the workspace name cannot be changed.
Location (Mandatory)
The Azure location where the workspace should be hosted. Note, if your organisation only has one location available, this dropdown will be uneditable and the default location will be set.
Reference (Optional)
A one-line reference or description of the workspace. This will only be seen by the Tenant Administrator.
Description (Optional)
A description of the workspace. Note, you may use formatting to enhance the description. This will be seen by other TAs and all members of the workspace. Workspace Administrators can edit the Description post-deployment.
Tags (Optional)
Tags are used to label and categorise workspaces to provide more context-specific navigation when searching for workspaces. For example, a user might tag a series of workspaces with a specific project name or disease type. Existing tags are available via the dropdown menu, and new ones can be created using the + button.
Workspace Members (Mandatory)
To add workspace members, type their name and email into the dialogue boxes provided. Existing users will appear as selectable options as you beginning typing their details. Users you are adding who do not have an existing account will receive an email inviting them to register for the service once the workspace has been created. Select to Add them to the list.
Each workspace can have one owner who is automatically assigned the role of a Workspace Administrator. See below for more information.
You can change the user role using the dropdown menu next to their name to select either Standard, Owner, Administrator, Manager or Contributor role. You can also remove workspace members using the Remove icon.

Workspace Owners
The Workspace Owner role is now optional. If your organisation wishes to remove the use of the owner role in one or more workspaces, please contact Aridhia Service Desk who will be able to remove the requirement.
If the Owner role is not used, members should be added to the workspace as usual. Please note that if no member of the workspace has the authority to approve airlocks, no airlocks will be able to be requested by members of that workspace; all of the options to create an airlock will be hidden from users.
The Tenant Administrator should not add themself as the workspace owner; in this case another TA will be required to verify the workspace.
Workspace Restrictions (Optional)
Restrictions are statements or documents that a user of a workspace must agree to prior to being granted access to the workspace. You can find more details on this in our Workspace Restrictions article. These can be added to a workspace using the restriction tab at the top of the page.
Networking
The admin can use the Networking tab to add items to the workspace's Allow list so that workspace members can access resources outside of the workspace subnet. More information is available here
Add Workspace
Once you are happy with the workspace setup, agree to any applicable terms & conditions and then select Add workspace. Users who were added to the workspace should receive an email when the workspace is ready to be used.
Additional Services
Additional services such as de-identification and Virtual Machines are not yet available on a self-service basis. To enable any of these services, please contact the Aridhia Service Desk quoting the name of the workspace and the name of the service you wish to add. Note, this option may not be visible to some customers.
